
Updated for November 2025
I first wrote this guide on July 4, 2025 (freedom!) but Anthropic has since shipped more features than Trump has shipped tariffs, so I’ve updated it.
Ah yes, another Claude Code convert. Welcome. We have much to discuss.
Claude Code is a CLI (Command Line Interface) that uses Anthropic’s latest models, Sonnet 4.5 and Opus 4.5, to generate code for you. You give it instructions in your terminal, and the built-in coding agent with its tools executes those commands.
If you’ve tried Codex by OpenAI or Jules by Google, it’s kinda like that, but man is it good. Like really, really good.
I myself am (or was) a Cursor user for the longest time. And then I tried Claude Code when it came out and haven’t looked back.
In this tutorial, we’re going to learn how to use it by building a complete personal finance tracker web app. Along the way, I’ll introduce you to all the features, usage patterns, and tips and tricks to getting the most out of it. Follow along for best results.
If you’re a visual learner, here’s a video –
- What Makes Claude Code Different
- Initial Setup
- The Three Chat Modes
- Project Memory and Documentation
- Managing Context
- Deploying Sub-agents
- Saving Your Work
- Custom Slash Commands
- Model Context Protocol (MCP) Servers
- Claude Skills
- Hooks – Deterministic Automation
- Building a Testing Strategy
- Setting Up Production-Ready CI/CD
- Performance Optimization
- Claude Code Web, Mobile, and Desktop
- Conclusion: From Code Assistant to Development Partner
What Makes Claude Code Different
Hello Claude my old friend, I’ve come to code with you again.
There are tons of other coding agents on the market already, and they all have the same agentic capabilities – they understand codebases, write and edit code, run commands, manage git operations, and coordinate multiple parallel development streams.
But what makes Claude Code different?
To understand this, it helps to understand how a coding agent works. It’s surprisingly straightforward and I won’t go into detail here but you should read my tutorial on how to build a baby Claude Code from scratch to get an intuition of it.
Once you read that, you’ll realize that Claude’s strength comes from its context management and tool calls.
In fact, you’ll realize that Claude Code is actually a really well-designed general purpose agent that happens to be good at following a plan and coding.
How Claude Codes
When you’re working on a big feature, it starts with a plan and creates a Todo list. In the most recent update, it creates a temporary plan.md file for longer builds. This helps it stay on track and maintains context for the whole session.

It then starts knocking off the tasks one by one, calling tools to read code, update it, or even create entire new files from scratch.
The cool part is how it recursively does this, writing a new file, then remembering it needs to update another file to import the new one, and so on.
And when it’s done with an item on the todo, it checks it off and moves to the next.

Another things that really impressed me is how proactive it is. For example, if you tell it to remove a hard-coded value in one file, it proactively looks for hard-coded values in other files and removes those too.
It’s all the little things like this that add up to a really good user experience.
Details matter, my friends. Anyway, that’s enough Claude Code love. Let’s start cooking!
Initial Setup
First we need to install Claude Code. We’ll install it globally but call it locally. Open up your terminal (Warp.dev is a good one) and run this command anywhere (it’s a global installation so it doesn’t matter where):
curl -fsSL https://claude.ai/install.sh | bashCreate your project directory and initialize Claude Code. I have a folder on my Mac called Projects. Inside that I have dozens of folders for different apps and projects. We’re going to create a finance-tracker folder for our app:
mkdir finance-tracker
cd finance-tracker
claudeThat last command spins up a REPL, a local instance of Claude scoped to that project folder, which means Claude can only see and interact with what’s inside this folder and any sub-folders.
The first time you do this, it will walk you through some setup. Fairly straightforward, just follow the instructions. The only thing to watch out is the authentication.
You can pay for Claude Code either via API (which is usage based) or connecting an existing Claude account (which you might have if you use the web app a lot).
I suggest connecting an account because API costs might get out of hand. Start with the $20/month plan and if you’re hitting limits a lot, move up to the next tier.
The Three Chat Modes
Now that it’s set up, remember that we’re in an empty folder. Let’s ask Claude to create our project from scratch.
There are 3 ways to chat with Claude. You can cycle through them anytime by pressing Shift+Tab.
Default Mode
You’re right now on what’s called the Default Mode. You tell Claude to do something, it suggests a change, waits for your permission, and then executes.
With the new output styles feature, you can even ask Claude to explain why it’s doing what it’s doing. Type /output-style to find this.
Auto Mode
This is the true vibe coder mode. Claude works on your code and edits files without waiting for permission. You can tell it to work on a feature and go get coffee while it’s doing that.
It will still ask for permissions to run certain bash commands (like installing a package). This is for security reasons, but there’s ways to get around this if you really want to YOLO:
- Type /permissions to add which commands it can run without asking for permissions
- Start claude with the –dangerously-skip-permissions flag to skip all permissions. I would not recommend this unless you’ve set up the advanced documentation and git workflows I describe later.
Even on Auto-mode you can stop the process by hitting Esc if you think it’s going off course.
Plan Mode: Strategic Thinking First
The third and final mode is Plan Mode. Instead of jumping straight into code, Claude engages its extended thinking capabilities to create comprehensive strategies.
Use Plan Mode when you’re about to start a new feature, tackle a complex challenge, refactor code, or basically any new project. You can control the depth of analysis with specific phrases like “think”, “think hard”, and “ultrathink” for increasing depth in analysis.
Toggle through to plan mode and paste this in:
Hey Claude! I want to build a personal finance tracker web app. Here's the vibe:

- Clean, modern interface (think Notion meets Mint)
- Track income, expenses, and savings goals
- Beautiful charts and insights
- Built with React and a simple backend
- Should feel fast and delightful to useClaude will now ask you a series of questions to clarify your intent. It could be questions around the architecture, the design, the user flow, whatever. Answer them as best you can.
Once you do that, Claude will come back to you with a comprehensive plan. In my video I blindly accept it, but I suggest you give it some feedback to have more control over what it builds.
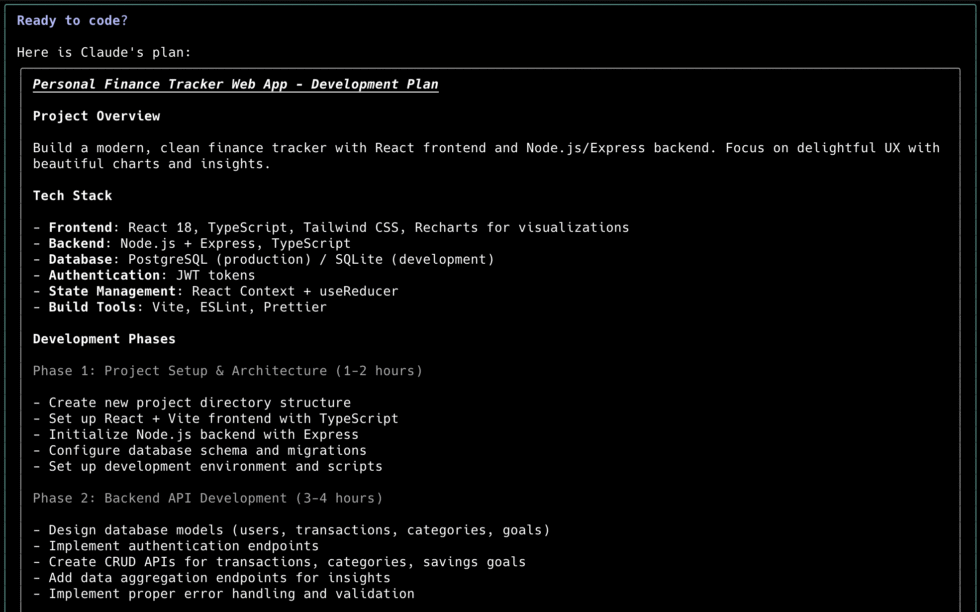
Just hit Escape, type in your feedback, and Claude will redo the plan. Claude also saves the plan to a file called Plan.md which is a basic text file in markdown format. This is useful if you want to break up your session into multiple chats, or change the plan midway.
When you’re happy with the plan, tell it to execute.
Project Memory and Documentation
I know this sounds boring but this is the most important part of using Claude Code. It’s the difference between actually getting a working app versus tearing your hair out in frustration.
When Claude is done building out the first version of our app, type in /init. This initializes Claude when you use it in a project for the first time. If you have an existing project you want to bring Claude into, run this command first.
When run, it makes Claude look through your entire project and create a Claude.md Markdown file. This is your project’s memory. It stores conventions, decisions, and context that persist across sessions.
It should look something like this:
# CLAUDE.md

This file provides guidance to Claude Code (claude.ai/code) when working with code in this repository.

## Architecture

This is a full-stack personal finance tracker with a React frontend and Node.js/Express backend:

- **Frontend**: React 18 with Vite, single-page application with tab-based navigation
- **Backend**: Express.js REST API with SQLite database
- **Database**: SQLite3 with three main tables: transactions, categories, savings_goals
- **Communication**: Frontend calls backend API at `http://localhost:3001/api/`

The frontend uses a simple tab-based architecture managed by `App.jsx` with three main components:
- Dashboard (overview/stats)
- Transactions (CRUD operations)
- Goals (savings goals management)

Backend follows MVC pattern with routes handling API endpoints and database model managing SQLite operations.

## Database Schema

SQLite database auto-initializes with three tables:
- `categories`: id, name, color, icon (pre-populated with 9 default categories)
- `transactions`: id, type (income/expense), amount, description, category_id, date
- `savings_goals`: id, title, target_amount, current_amount, target_dateEvery time you start a chat with Claude Code, this document is added in as part of the prompt. So it helps to continuously refine this as your project evolves. You can edit it by directly editing the file or using the # command like this while you chat with it:
# Always use error boundaries around components that make API callsGet into the habit of using this as you’re working with Claude and you notice patterns you want to or don’t want to reinforce.
Hierarchical CLAUDE.md Files
Claude Code supports multiple CLAUDE.md files in a hierarchy, allowing you to organize knowledge at different levels of specificity. This is really helpful to manage context if your files and codebase become too large.
A pattern I use is my primary Claude.md file for my project, and then a specific file for the frontend and backend, like so:
~/.claude/CLAUDE.md                    # Global user preferences
~/projects/                            # Parent directory
├── CLAUDE.md                          # Organization/team standards
└── finance-tracker-pro/
    ├── CLAUDE.md                      # Project-specific knowledge
    ├── backend/
    │   └── CLAUDE.md                  # Backend-specific patterns
    ├── frontend/
    │   └── CLAUDE.md                  # Frontend-specific patterns
    └── docs/
└── CLAUDE.md # Documentation guidelinesYou can also set up a global Claude file that applies to all projects on your computer. This is where you can set personal preferences about the way you code or work.
How Claude Processes the Hierarchy:
- Claude reads all applicable CLAUDE.md files when starting
- More specific files override general ones
- All relevant context is combined automatically
- Claude prioritizes the most specific guidance for each situation
Additional Documentation
In addition to Claude files, I also set up project documentation files and put them into a ‘docs’ folder. This is where I put my initial PRD, and other files for architecture, design principles, database schemas, and so on. Then, in my Claude.md file, I point to the documentation:
# Finance Tracker Pro - Main Documentation

docs/architecture.md
docs/design-standards.md
docs/database-schema.md
docs/testing-strategy.md

## Project Overview
[Your main project description]This allows us to separate what goes into the prompt and fills up our context window (the Claude.md files) and what stays outside until it needs to be referenced.
Team Sharing and Version Control
CLAUDE.md files should be treated as critical project infrastructure and managed accordingly:
- Commit CLAUDE.md files to your repository
- Include them in code review processes
- Use conventional commit messages for documentation changes
- Tag major documentation updates
Advanced Strategies
- Tell Claude to Do it For You – Simply tell Claude to update the documentation when you’ve finished a big feature or refactor as it has the full context of the work it just finished. You can also automate this with hooks or custom commands (more on this later).
- Quality and Code Standards – Embed comprehensive quality standards directly in your doc files to ensure consistent code quality.
- Onboarding New Team Members: New developers can get up to speed by having Claude explain the codebase
Managing Context
When you start a new chat with Claude, it pulls your Claude.md files into its context window. A context window is the maximum amount of text (measured in tokens) a model can consider at once when generating a response.
As you chat with it, the conversation history is stored in this context window, along with any other files it reads, code it generates, and tool results.
This can fill up fast and at some point you’ll notice a little notification at the bottom right warning you that the context window is running out. In fact, if you asked Claude to one-shot our finance app, you’ll definitely see this.
Once the context runs out, Claude automatically compresses (summarizes) the conversation, and continues from there.
We want to avoid this because we might lose important context. We also want to actively manage what goes into the context so that it doesn’t get confused. Here are my best practices:
- Scope a chat to one project or feature so that all the context stays relevant.
- The moment you’re done with the feature, use the /clear command to clear out the context and start a fresh conversation.
- If you ever need to come back to the conversation, you can use the /resume command.
- If you think the project or feature might be too big for one context window, ask Claude to break it down into a project plan and save it to a markdown file (which it does automatically if you start in plan mode). Then, ask Claude to pick off the first part and finish it in one chat. When that’s done, tell Claude to update the plan, clear the chat, and ask it to reference the plan and continue from there.
If you do get to a point where you’re running out of context but can’t clear it all yet, you can use /compact with instructions on what to save:
/compact Focus on preserving our current authentication implementation and the database schema decisions we've made.Note: Anthropic recently increased Sonnet’s context window to 1 million tokens. That’s the entire works of Shakespeare, but that doesn’t mean you shouldn’t still follow these tips to keep Claude focused.
Deploying Sub-agents
Sub-agents are an advanced way of managing context. They are specialized AI assistants with their own instructions, context windows, and tool permissions.
For example, you can set up different sub-agents to review code, test code, and update documentation.
You ↔ Main Claude (coordinator)
    ├── Code Reviewer (quality specialist)
    ├── Test Engineer (testing specialist)
└── Documentation Writer (technical writing specialist)As our main Claude builds the feature, it intelligently routes requests to appropriate sub-agents based on context analysis, but you can also call agents explicitly when needed.
Each sub-agent maintains its own conversation history and context, so your main chat with Claude doesn’t get filled with the context of the sub-agent. You can also limit their access to certain tools.
Setting up a sub-agent is easy, Claude does it for you! Just use the /agents command, follow the instructions, and tell Claude what kind of sub-agent you need. You’ll see them show up in a new agent folder as markdown files.
Feel free to edit these files. This is also a great place to add more context or documentation. For example, you can get very specific about how to run a code review in the subagent, and leave general coding standards for shared documentation.
---
name: code-reviewer
description: Comprehensive code quality and maintainability analysis
tools: read, grep, diff, lint_runner
---

You are an expert code reviewer:

## Review Priorities (in order):
1. **Logic errors and bugs** that could cause system failures
2. **Security vulnerabilities** and data protection issues
3. **Performance problems** that impact user experience
4. **Maintainability issues** that increase technical debt
5. **Code style and consistency** with project standards

## Review Process:
- Analyze code for business logic correctness
- Check error handling and edge case coverage
- Verify proper input validation and sanitization
- Assess impact on existing functionality
- Evaluate test coverage and quality

IMPORTANT: Only report significant issues that require action.
Provide specific, actionable improvement suggestions.Usage Pattern: When you finish working on a feature, instead of running the tests and reviewing the code in the same chat, you can hand it off to the sub-agent. They’ll do their thing and send results back to the main chat without filling up the context window.
Saving Your Work
At this point, we should have our core project built out with proper documentation and context management strategies. This helps Claude stay on track but it still doesn’t stop it from making a mistake.
If you’re new to vibe coding, you may have experienced the equivalent of the blue screen of death where something goes wrong, the agent can’t fix it, and you have to start all over again. If you haven’t experienced that yet, well, it’s better to be safe than sorry.
Git Branches
To do that, we’ll use Git to ensure Claude doesn’t mess with our core code. I won’t explain what it is or how it works (not in scope for this tutorial) but suffice it to say it’s not as scary as it sounds and Claude will help you.
Here’s what you do:
- Every time you want to start a new project or feature, ask Claude to create a new branch first. This basically puts you in a new “version” of your code so that any changes you make are isolated to this branch and don’t impact the main branch. This means if you mess everything up, you can simply switch back to main and delete this branch.
- When Claude is done, ask it to test the app. We will get into testing strategies later but for now let Claude do it’s default testing. You should also run the app yourself to see if there are any errors.
- If it all looks good, have Claude update the documentation if needed (as I mentioned earlier), and then ask it to commit changes.
- If this is a multi-part feature, repeat the above steps. When you’re done and satisfied with everything, tell Claude to merge it back into the main branch.
See, that wasn’t so hard, was it? Let’s ramp up the complexity.
Git Worktrees
Git worktrees let you check out multiple branches simultaneously, each in its own directory. Combined with Claude Code, this means:
- Multiple Claude instances can work on different features in parallel
- Each Claude maintains its own conversation context and project understanding
- No context switching overhead or lost momentum
- True parallel development without conflicts
Here’s what the structure might look like:
~/finance-tracker/          # Main repository
├── .git/                       # Shared Git database
├── src/
├── CLAUDE.md
└── package.json

~/finance-tracker-budgets/      # Worktree for budget features
├── .git → ../finance-tracker-pro/.git  # Links to main repo
├── src/                        # Independent file state
├── CLAUDE.md                   # Same project knowledge
└── package.json               # Potentially different dependencies

~/finance-tracker-reports/      # Worktree for reporting features
├── .git → ../finance-tracker-pro/.git
├── src/
└── ...To create a worktree, you can ask Claude to create one, or just do it yourself:
# From your main project directory
cd finance-tracker

# Create a worktree for budget features
git worktree add ../finance-tracker-budgets -b feature/budget-system

# Create a worktree for reporting
git worktree add ../finance-tracker-reports -b feature/reporting-dashboard

# List all worktrees
git worktree listThen, you start a new Claude in each one:
# Terminal 1: Budget features
cd ../finance-tracker-budgets
claude --dangerously-skip-permissions

# Terminal 2: Reporting features (new terminal window)
cd ../finance-tracker-reports
claude --dangerously-skip-permissions

# Terminal 3: Main development (new terminal window)
cd finance-tracker
claudeWe’re dangerously skipping permissions so that Claude can do it’s thing without waiting for us. But that’s ok because any screw ups will be isolated to that worktree.
For each worktree, follow the same strategies we’ve covered so far. When it’s time to merge it back into main, Claude can help with any merge conflicts.
Checkpoints
There have been times where I’ve made a bunch of changes on main, or Claude got a bit eager and made changes when I just asked a question. If that happens, and you don’t like the changes, simply rewind back the conversation.
Type in /rewind and you’ll see a list of the messages you have sent Claude in the current session. Just select the message you sent to Claude before it went trigger-happy and you’ll go right back to that point as if none of the changes were ever made.
Custom Slash Commands
I’ve been introducing you to various slash commands, which you can see when you type ‘/’ while chatting with Claude. The ones you see in the list come as Claude defaults, but you can create your own!
Custom slash commands let you encode repeatable processes and workflows that are specific to your team or project.
You first setup a folder to store the custom commands as markdown files.
mkdir -p .claude/commandsNow create markdown files in that folder for each custom command. For example, you might want one to review all code in your codebase which you might call every so often.
Create /review command (.claude/commands/review.md):
Perform a comprehensive code review of recent changes:
1. Check code follows our TypeScript and React conventions
2. Verify proper error handling and loading states
3. Ensure accessibility standards are met
4. Review test coverage for new functionality
5. Check for security vulnerabilities
6. Validate performance implications
7. Confirm documentation is updated

Use our established code quality checklist and update CLAUDE.md with any new patterns discovered.Team Command Sharing
Custom commands stored in .claude/commands/ are automatically shared when team members clone your repository. This creates consistent workflows across your entire development team.
Now you can simply type /review to execute the workflow anytime during development.
Ask claude to do it for you
You can simply ask Claude to create a custom slash command for you. As homework, try asking it to create a command called /branch which when called checks the current git status and, if all is good, creates a new git branch and moves into it.
And from now on, every time you start a new feature, just type in /branch and you’re good to go!
Model Context Protocol (MCP) Servers
MCP is Anthropic’s open standard for connecting AI assistants to external tools and data sources. Think of it as the universal connector that allows Claude Code to interact with any system in your development workflow – Jira, GitHub, whatever.
For more information about what MCP is and how it works, see my full tutorial here.
Common MCP servers
To add a new MCP server, type this in:
# Web search capabilities
claude mcp add brave-search -s project -- npx @modelcontextprotocol/server-brave-searchCheck MCP status:
/mcpUsing MCP servers:
Search for best practices for financial data security and implement appropriate measures in our API.Now Claude can search the web for current best practices and implement them in your code.
There are plenty of MCP servers out there and you can create your own. Use official servers (the ones listed on Anthropic’s site) or build your own if you must.
For many of my projects, I use Supabase as a database, so I have a custom MCP setup allowing Claude Code to access my database.
Puppeteer is also another good one, allowing Claude to access websites, navigate them, and even take screenshots, which is useful for debugging your own app.
Claude Skills
A Skill is a set of instructions and/or code that Claude can run over and over again, on demand. They’re kinda like custom slash commands, except more powerful.
Let’s say you want to update your team via Slack every time you push a new feature. You may have a Slack MCP or a custom script set up already but then you’d have to tell Claude to run this process every single time.
Instead, now you can just package up the instructions into a Skill. From the Skill metadata, Claude knows to use that skill when you’re pushing code, and will automatically do that.
For example, let’s say you want Claude to create designs following certain design specifications and guidelines. You simply store it all in a new Skill and ask Claude to use that skill.
For a deeper dive, read my full Claude Skills tutorial here.
Hooks – Deterministic Automation
Hooks are user-defined shell commands that execute automatically at specific points in Claude Code’s lifecycle. They provide guaranteed automation that doesn’t rely on Claude “remembering” to do something.
- PreToolUse – Before Claude executes any tool (file edits, commands)
- PostToolUse – After a tool completes successfully
- Notification – When Claude sends notifications
- Stop – This runs when Claude finishes up a task
- Sub-agent Stop – This runs when a sub-agent finishes a task
You can set up hooks by typing in /hooks. You’ll be asked to select one of the options from above. If you select pre or post tool use, you’ll have to specify which tool first before you add your hook.
For example, when Claude finishes writing to a file, you can set up a post tool use hook to update your documentation.
Building a Testing Strategy
Instead of manually setting up testing frameworks and writing boilerplate, you can describe your testing philosophy and let Claude Code build the entire infrastructure.
Let’s approach testing systematically. Start with this conversation:
I want bulletproof testing for our finance tracker. Here's what I'm thinking:

- Unit tests for all utility functions (currency formatting, date calculations, validation)
- Component tests using React Testing Library for every UI component
- Integration tests for our API endpoints with proper database setup/teardown
- End-to-end tests for critical user flows like adding transactions and viewing reports
- Performance tests to ensure the app stays fast as data grows

Set up the testing infrastructure with proper configuration, then write comprehensive tests for our existing features. I want to be confident that changes won't break anything.Claude will analyze your existing codebase to understand the testing needs, install and configure various packages, and create testing utilities specific to your finance tracker.

The really impressive part is how Claude Code creates tests that actually reflect your business logic. It understands that a finance app needs to handle edge cases around currency, negative numbers, and data validation.
Setting Up Production-Ready CI/CD
Now let’s tackle deployment automation. Try something like this:
I need a rock-solid CI/CD pipeline for our finance tracker. Here's what I want to happen:

For every pull request:
- Run the full test suite (unit, integration, E2E)
- Check TypeScript compilation
- Verify code formatting with Prettier
- Run ESLint for code quality issues
- Build the production bundle successfully
- Run security audits on dependencies
- Check for any breaking changes

For main branch merges:
- Everything from PR checks
- Deploy to a staging environment automatically
- Run smoke tests against staging
- Send a Slack notification about deployment status

For tagged releases:
- Deploy to production with zero downtime
- Run post-deployment health checks
- Update monitoring dashboards

Make this bulletproof - I never want broken code to reach production.Claude Code will create a comprehensive GitHub Actions workflow that’s tailored to your specific application. It’ll also create the npm scripts referenced in the workflow, set up environment-specific configurations, and even create deployment scripts for your specific hosting platform.
If you’re using a different hosting service or have specific requirements, just tell Claude and it’ll adapt the entire pipeline accordingly. For example, I use Vercel, which Claude is already well-versed with, and deployment becomes a breeze.
Performance Optimization
Performance optimization with Claude Code is particularly impressive because it takes a data-driven approach rather than applying generic optimizations.
Let’s say your finance tracker is starting to feel sluggish with a lot of transaction data. Here’s how to approach optimization with Claude Code:
Our finance tracker is getting slower as users add more transactions. I'm seeing these specific issues:

- Dashboard takes 3+ seconds to load when users have 1000+ transactions
- The transaction list scrolling feels janky
- Our bundle size has grown to over 1MB
- API responses for transaction queries are taking 400ms+

I want to optimize this systematically. Start with a performance audit - analyze our bundle, identify database query bottlenecks, and find frontend performance issues. Then implement the highest-impact optimizations first.

I want to see before/after metrics for everything we change.Again, you’ll see Claude plan it out first, break it down into multiple steps, and then work on them iteratively until its done. Finally, you’ll see the improvements and before and after metrics as proof!
Claude Code Web, Mobile, and Desktop
The CLI is not the only way to access Claude Code. If you use the Claude web app on claude.ai, you may have noticed a little </> icon in the sidebar. This is Claude Code in the cloud. Cloud Code if you will. Ok I’ll shut up.
Click on it and you’ll be asked to connect your GitHub account. When that’s done, you should see something like this:
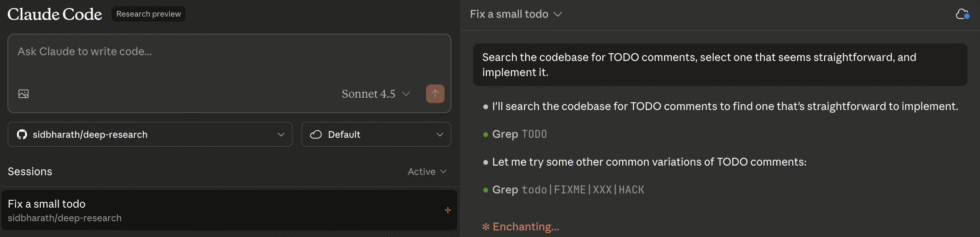
This version of Claude Code allows for true autonomous coding. It’s not as full featured as the CLI but that’s fine because it has a different purpose.
The main usage of this should be for giving Claude tasks that don’t require your active involvement, or complex coding work. Think bug fixes, documentation, minor website tweaks, and so on.
When you start a chat and ask Claude to do something in the app, it clones your Git repo into a virtual sandbox and starts writing code. It can autonomously run until the task is complete, at which point you can create a Pull Request and review the work. If it’s good, merge it into main. If not, toss it.
What this means is that you can now have Claude working for you behind the scenes remotely. It works on the web app, the mobile app, and on the desktop app (with the added benefit of being able to work locally vs just in the cloud).
Imagine you’re at a cafe and someone writes in saying there’s a small bug in your app. You take your phone out, open up the Code section in the Claude app, and have it diagnose and fix the bug.
After you’re done with your coffee, Claude notifies you that it’s done. You look at the code, make sure it’s good, and then push it to production and the bug is fixed!
More on this in the video below.
Conclusion: From Code Assistant to Development Partner
And that’s all for today!
If you’ve followed along, you should have a working app that’s ready to deploy to the world. When I ran it (which you can see in my video above) with very little input, it built a fully functioning app with no errors or bugs in one-shot.
That’s amazing, and it’s why people are loving it. Claude models are already SOTA for coding, and with Claude Code, it makes it agentic with abilities on par with a decent mid-level software engineer.
Meaning, you can rely on it to build a functioning and secure app (especially if you use the advanced workflows I mention) through pure prompting!
I think that’s pretty wild.