
I have been a heavy user of Claude Code since it came out (and recently Amp Code). As someone who builds agents for a living, I’ve always wondered what makes it so good.
So I decided to try and reverse engineer it.
It turns out building a coding agent is surprisingly straightforward once you understand the core concepts. You don’t need a PhD in machine learning or years of AI research experience. You don’t even need an agent framework.
Over the course of this tutorial, we’re going to build a baby Claude Code (Baby Code for short) using nothing but Python. It won’t be nearly as good as the real thing, but you will have a real, working agent that can:
- Read and understand codebases
- Execute code safely in a sandboxed environment
- Iterate on solutions based on test results and error feedback
- Handle multi-step coding tasks
- Debug itself when things go wrong
So grab your favorite terminal, fire up your Python environment, and let’s build something awesome.
Understanding Coding Agents: Core Concepts
Before we dive into implementation details, let’s take a step back and define what a “coding agent” actually is.
An agent is a system that perceives its environment, makes decisions based on those perceptions, and takes actions to achieve goals.
In our case, the environment is a codebase, the perceptions come from reading files and executing code, and the actions are things like creating files, running tests, or modifying existing code.
What makes coding agents particularly interesting is that they operate in a domain that’s already highly structured and rule-based. Code either works or it doesn’t. Tests pass or fail. Syntax is valid or invalid. This binary feedback creates excellent training signals for iterative improvement.
The ReAct Pattern: How Agents Actually Think
Most agents today follow a pattern called ReAct (Reason, Act, Observe). Here’s how it works in practice:
Reason: The agent analyzes the current situation and plans its next step. “I need to understand this codebase. Let me start by looking at the main entry point and understanding the project structure.”
Act: The agent takes a concrete action based on its reasoning. It might read a file, execute a command, or write some code.
Observe: The agent examines the results of its action and incorporates that feedback into its understanding.
Then the cycle repeats. Reason → Act → Observe → Reason → Act → Observe.
It’s similar to how humans solve problems. When you’re debugging a complex issue, you don’t just stare at the code hoping for divine inspiration. You form a hypothesis (reason), test it by adding a print statement or running a specific test (act), look at the results (observe), and then refine your understanding based on what you learned.
The Four Pillars of Our Coding Agent
Every effective AI agent needs four core components – The brain, the tools, the instructions, and the memory or context.
I’ll skim over the details here but I’ve explained more in my guide to designing AI agents.
- The brain is the core LLM that does the reasoning and code gen. Reasoning models like Claude Sonnet, Gemini 2.5 Pro, and OpenAI’s o-series or GPT-5 are recommended. In this tutorial we use Claude Sonnet.
- The instructions are the core system prompt you give to the LLM when you initialize it. Read about prompt engineering to learn more.
- The tools are the concrete actions your agent can take in the world. Reading files, writing code, executing commands, running tests – basically anything a human developer can do through their keyboard.
- Memory is the data your agent works with. For coding agents, we need a context management system that allows your agent to work with large codebases by intelligently selecting the most relevant information for each task.
For coding agents specifically, I’d add that we need an execution sandbox. Your agent will be writing and executing code, potentially on your production machine. Without proper sandboxing, you’re essentially giving a very enthusiastic and tireless intern root access to your system.
PS: You can get the full code for this and a bunch of other stuff in my workbook below.
The Agent Architecture We’re Building
I want to show you the complete blueprint before we start coding, because understanding the overall architecture will make every individual component make sense as we implement it.
Here’s our roadmap:
Phase 1: Minimal Viable Agent – Get the core ReAct loop working with basic file operations. By the end of this phase, you’ll have an agent that can read files, understand simple tasks, and reason through solutions step by step.
Phase 2: Safe Code Execution Engine – Add the ability to generate and execute code safely. This is where we implement AST-based validation and process sandboxing. Your agent will be able to write Python code, test it, and iterate based on the results.
Phase 3: Context Management for Large Codebases – Scale beyond toy examples to real projects. We’ll implement search and intelligent context retrieval so your agent can work with codebases containing hundreds of files.
Each phase builds on the previous one, and you’ll have working software at every step.
Phase 1: Minimum Viable Agent
We’re going to do this all in one file and 300 lines of code. Just create a folder in your computer and in it create a file called agent.py
Step 1: Setup our 4 pillars
Remember, the four pillars of an agent are the brain (or the model), the instructions (system prompt), the tools, and memory.
Let’s start with instructions. Here’s my system prompt, feel free to tweak it as needed:
SYSTEM_PROMPT = """You are a helpful coding assistant that can read, write, and manage files.

You have access to the following tools:
- read_file: Read the contents of a file
- write_file: Write content to a file (creates or overwrites)
- list_files: List files in a directory

When given a task:
1. Think about what you need to do
2. Use tools to gather information or make changes
3. Continue until the task is complete
4. Explain what you did

Always be careful when writing files - make sure you understand the existing content first."""Current gen models have a tool use ability and you just need to send it a schema up front so that when it’s reasoning it can look at the tool list and decide if it needs one to help with it’s task.
We define it like this:
TOOLS = [
    {
        "name": "read_file",
        "description": "Read the contents of a file at the given path. Returns the file content as a string.",
        "input_schema": {
            "type": "object",
            "properties": {
                "path": {
                    "type": "string",
                    "description": "The path to the file to read"
                }
            },
            "required": ["path"]
        }
    },
      { # Other tool definitions follow a similar pattern
        }
]Let’s also define our actual tool logic. Here’s what it would look like for the Read File tool:
def read_file(path: str) -> str:
    """Read and return the contents of a file."""
    try:
        with open(path, 'r') as f:
            return f.read()
    except FileNotFoundError:
        return f"Error: File not found: {path}"
    except PermissionError:
        return f"Error: Permission denied: {path}"
    except Exception as e:
return f"Error reading file: {e}"Continue defining the rest of the tools that way and add them to the tools schema. You can look at the full code in my GitHub Repository for help.
I have implemented read, write, and list, but you can add more for an extra challenge.
We’ll also need a function to execute the tool that we call if our LLM responds with a tool use request.
def execute_tool(tool_name: str, tool_input: dict) -> str:
    """Execute a tool and return its result."""
    try:
        if tool_name == "read_file":
            return read_file(tool_input["path"])
        elif tool_name == "write_file":
            return write_file(tool_input["path"], tool_input["content"])
        elif tool_name == "list_files":
            return list_files(tool_input.get("path", "."))
        else:
            return f"Error: Unknown tool: {tool_name}"
    except Exception as e:
return f"Error executing {tool_name}: {e}"For our brain, we’ll use Sonnet 4 but any reasoning model will do. And for our memory, it’s going to be a basic conversation history. We’ll see what this looks like in the next section.
Step 2: Build the ReAct Loop
With our four pillars ready, we need to guide our model to follow the ReAct pattern. This block of code is where all the magic happens:
def run_agent(user_message: str, conversation_history: list = None) -> None:
    """
    Run the agent with a user message, streaming the response.

    This implements the ReAct (Reason, Act, Observe) loop:
    1. Send message to Claude (streaming)
    2. If Claude wants to use a tool, execute it and continue
    3. Repeat until Claude gives a final response
    """
    if conversation_history is None:
        conversation_history = []

    # Add the user's message to the conversation
    conversation_history.append({
        "role": "user",
        "content": user_message
    })

    # ReAct loop - keep going until the model stops using tools
    while True:
        # Collect the full response while streaming
        assistant_content = []
        current_text = ""
        current_tool_use = None

        # Stream the response
        with client.messages.stream(
            model="claude-sonnet-4-20250514",
            max_tokens=4096,
            system=SYSTEM_PROMPT,
            tools=TOOLS,
            messages=conversation_history
        ) as stream:
            for event in stream:
                # Handle different event types
                if event.type == "content_block_start":
                    if event.content_block.type == "text":
                        current_text = ""
                    elif event.content_block.type == "tool_use":
                        current_tool_use = {
                            "type": "tool_use",
                            "id": event.content_block.id,
                            "name": event.content_block.name,
                            "input": {}
                        }
                        # Show real-time feedback when a tool use starts
                        print(f"\n  → Using tool: {current_tool_use['name']}")
                        sys.stdout.flush()

                elif event.type == "content_block_delta":
                    if event.delta.type == "text_delta":
                        # Stream text to stdout immediately
                        sys.stdout.write(event.delta.text)
                        sys.stdout.flush()
                        current_text += event.delta.text
                    elif event.delta.type == "input_json_delta":
                        # Accumulate tool input JSON
                        pass  # We'll get the full input from the final message

                elif event.type == "content_block_stop":
                    if current_text:
                        assistant_content.append({
                            "type": "text",
                            "text": current_text
                        })
                        current_text = ""
                    elif current_tool_use:
                        # Tool use block completed
                        current_tool_use = None

            # Get the final message to extract complete tool uses
            final_message = stream.get_final_message()

        # Use the content from the final message (has complete tool inputs)
        conversation_history.append({
            "role": "assistant",
            "content": final_message.content
        })

        # Check if there are any tool uses
        tool_uses = [block for block in final_message.content if block.type == "tool_use"]

        if tool_uses:
            # Process each tool use
            tool_results = []
            for block in tool_uses:
                result = execute_tool(block.name, block.input)

                tool_results.append({
                    "type": "tool_result",
                    "tool_use_id": block.id,
                    "content": result
                })

            # Add tool results to the conversation
            conversation_history.append({
                "role": "user",
                "content": tool_results
            })
            # Continue loop to get Claude's next response

        else:
            # No tool uses - we're done
            print()  # Final newline after streamed content
returnYes, it really is just a while loop. We call Claude with our request and it answers. If it needs to use a tool, we process the tool (as defined before) and then send back the tool result.
And then we loop.
When there are no more tool calls, we assume it’s done and print the final response.
We’re also streaming Claude’s responses for readability so that we can print it to our terminal and see what’s happening.
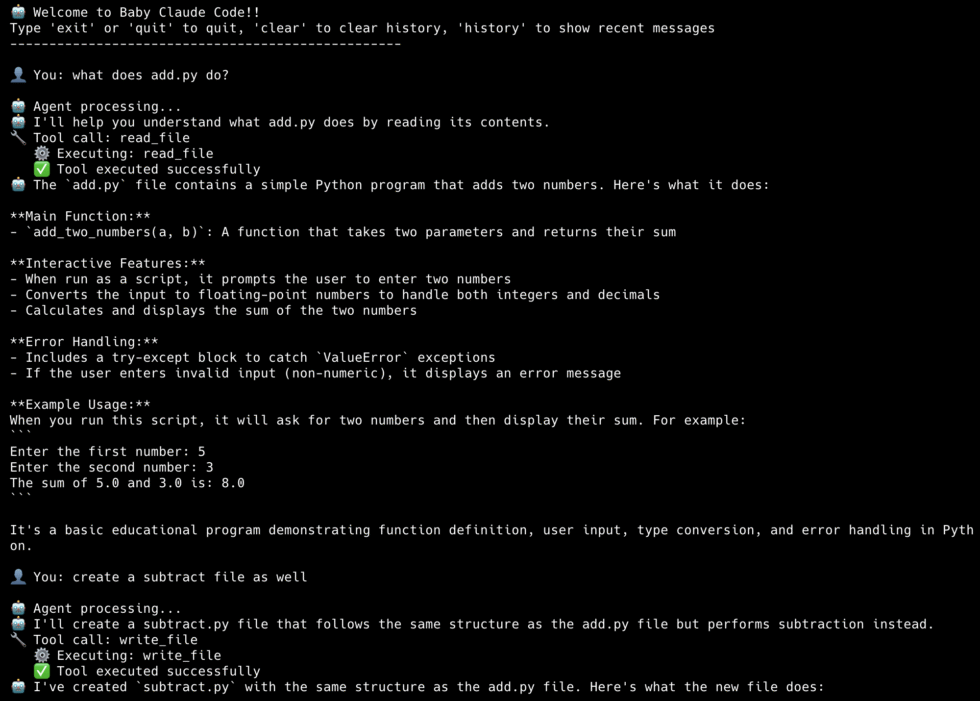
Let’s Test it out!
Our agent is ready to use. We’re at 300 lines of code, but that includes the comments, error handling, and helper functions for verbosity. Our core agent code is ~200 lines. Let’s see if it’s any good!
Let’s add a main function to our code so that we can get that CLI interface:
def main():
    """Main chat loop."""
    print("=" * 60)
    print("Baby Code Phase 1: Minimum Viable Coding Agent")
    print("=" * 60)
    print("Commands: 'quit' to exit, 'clear' to reset conversation")
    print("=" * 60)
    print()

    conversation_history = []

    while True:
        try:
            user_input = input("You: ").strip()
        except (EOFError, KeyboardInterrupt):
            print("\nGoodbye!")
            break

        if not user_input:
            continue

        if user_input.lower() == 'quit':
            print("Goodbye!")
            break

        if user_input.lower() == 'clear':
            conversation_history = []
            print("Conversation cleared.\n")
            continue

        print("\nAgent: ", end="", flush=True)
        run_agent(user_input, conversation_history)
        print()


if __name__ == "__main__":
main()Now run the file and watch your own baby Claude Code come to life!
Understanding the Code Flow
If you’ve been following along, you should have a working coding agent. It’s basic but it gets the job done.
We first pass your task to the run_agent method, which compiles a conversation history and calls Claude.
Based on our system prompt and tool schema, Claude decides if it needs to use a tool to answer our request. If so, it sends back a tool request which we execute. We add the results to our message history and send it back to Claude, and loop over.
We keep doing this until there are no more tool calls, in which case we assume Claude has nothing else to do and we return the final answer.
Et voila! We have a functioning coding agent that can explain codebases, write new code, and keep track of a conversation.
Pretty sweet.
I’ve added all the code to my Github. Enter your email below to receive it.
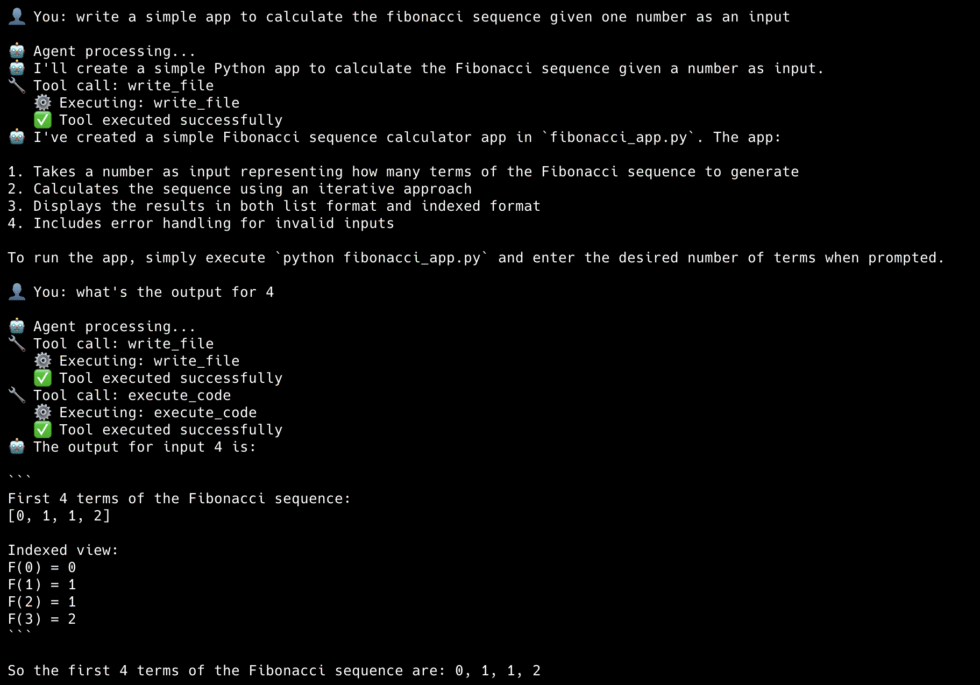
Phase 2: Adding Code Execution
We have a coding agent that can read and write code, but in this age of vibe coding, we want it to be able to text and execute code as well. Those bugs ain’t gonna debug themselves.
All we need to do is give it new tools to execute code. The main complexity is ensuring it doesn’t run malicious code or delete our OS by mistake. That’s why this phase is mostly about code validation and sandboxing. Let’s see how.
Step 1: Code Refactoring
Before we do anything, let’s refactor our existing code for better readability and modularity.
Here’s our new project structure:
coding_agent/
├── agent.py           # Main agent
├── executor.py        # Sandboxed Code executor
├── tools.py           # Tool definitions
├── validator.py # AST-based validatorMost of the code is pretty much the same. Agent.py is the core agent loop sans the tools setup, which go into a tools.py file.
We’re going to add two new tools: `run_python` for sandboxed Python execution, and `run_bash` for shell commands.
The run bash tool is a subprocess with a timeout:
def run_bash(command: str) -> str:
    try:
        result = subprocess.run(
            command,
            shell=True,
            capture_output=True,
            text=True,
            timeout=60,
            cwd=os.getcwd()
        )

        output = result.stdout
        if result.stderr:
            output += "\n--- stderr ---\n" + result.stderr

        if len(output) > 10000:
            output = output[:10000] + "\n... (output truncated)"

        if result.returncode == 0:
            return output if output else "(no output)"
        else:
            return f"Command failed (exit code {result.returncode}):\n{output}"

    except subprocess.TimeoutExpired:
return "Error: Command timed out after 60 seconds"This lets Claude run `npm install`, `pytest`, `git status`, or any other shell command. The 60-second timeout prevents runaway processes.
Step 2: The Validator
The validator uses Python’s Abstract Syntax Tree (AST) to analyze code before it runs. Think of it as a security guard that inspects code at the gate.
Before any code runs, we parse it and look for dangerous patterns:
BLOCKED_MODULES = {
    "os", "subprocess", "sys", "shutil",
    "socket", "requests", "urllib",
    "pathlib", "io", "builtins",
    "importlib", "ctypes", "multiprocessing"
}

BLOCKED_BUILTINS = {
    "exec", "eval", "compile",
    "open", "input", "__import__",
    "getattr", "setattr", "delattr",
    "globals", "locals", "vars"
}

class SafetyValidator(ast.NodeVisitor):
    def __init__(self):
        self.errors = []

    def visit_Import(self, node):
        for alias in node.names:
            module = alias.name.split('.')[0]
            if module in BLOCKED_MODULES:
                self.errors.append(f"Blocked import: '{alias.name}'")
        self.generic_visit(node)

    def visit_ImportFrom(self, node):
        if node.module:
            module = node.module.split('.')[0]
            if module in BLOCKED_MODULES:
                self.errors.append(f"Blocked import: 'from {node.module}'")
        self.generic_visit(node)

    def visit_Call(self, node):
        if isinstance(node.func, ast.Name):
            if node.func.id in BLOCKED_BUILTINS:
                self.errors.append(f"Blocked function: '{node.func.id}()'")
self.generic_visit(node)What the Validator Blocks:
- Dangerous Imports
import os  # BLOCKED - could delete files
import subprocess  # BLOCKED - could run shell commands
import socket # BLOCKED - could make network connections2. File Operations
open('file.txt', 'w')  # BLOCKED - could overwrite files
with open('/etc/passwd', 'r'): # BLOCKED - could read sensitive files3. Dangerous Built-in Functions
eval("malicious_code")  # BLOCKED - arbitrary code execution
exec("import os; os.system('rm -rf /')")  # BLOCKED
__import__('os') # BLOCKED - dynamic imports4. System Access Attempts
sys.exit()  # BLOCKED - could crash the program
os.environ['SECRET_KEY'] # BLOCKED - environment accessThe validator works by walking the AST and checking each node type:
ast.Importandast.ImportFromnodes → check against dangerous modulesast.Callnodes → check for dangerous function callsast.Attributenodes → check for dangerous attribute access
Most coding agents don’t actually block all of this. They have a permissioning system to give their users control. I’m just being overly cautious for the sake of this tutorial.
Step 3: The Executor
Even if code passes validation, we still need runtime protection. Again, I’m being overly cautious here and creating a separate sub-process to run code:
def execute_code(code: str) -> Tuple[bool, str]:
    # Validate first
    is_safe, errors = validate_code(code)
    if not is_safe:
        return False, "Validation failed:\n" + "\n".join(errors)

    # Write to temp file
    with tempfile.NamedTemporaryFile(mode='w', suffix='.py', delete=False) as f:
        f.write(code)
        temp_path = f.name

    try:
        result = subprocess.run(
            ['python3', temp_path],
            capture_output=True,
            text=True,
            timeout=10,
            env={
                'PATH': os.environ.get('PATH', '/usr/bin:/bin'),
                'HOME': '/tmp',
            }
        )
        output = result.stdout + result.stderr
        return result.returncode == 0, output

    except subprocess.TimeoutExpired:
        return False, "Timeout: Code took too long to execute"
    finally:
os.unlink(temp_path)How It All Works Together
Adding code execution transforms our agent from a simple file manipulator into a true coding assistant that can:
- Learn from execution results to improve its suggestions
- Write and immediately test solutions
- Debug by seeing actual error messages
- Iterate on solutions that don’t work
- Validate that code produces expected output
Here’s the complete flow when the agent executes code:
User Request: "Test this fibonacci function"
    ↓
1. Agent calls execute_code tool
    ↓
2. CodeValidator.validate(code)
    ├─ Parse to AST
    ├─ Check for dangerous imports ✓
    ├─ Check for dangerous functions ✓
    └─ Check for file operations ✓
    ↓
3. CodeExecutor.execute(code)
    ├─ Create sandboxed code file
    ├─ Apply restricted builtins
    ├─ Set resource limits
    ├─ Run in subprocess
    ├─ Monitor with timeout
    └─ Capture output safely
    ↓
4. Return results to agent
    ├─ stdout: "Fibonacci(10) = 55"
    ├─ stderr: ""
└─ success: trueAnd that’s Phase 2! If you’ve been implementing with me, you should be getting results like this:
Phase 3: Better Context management
Phases 1 and 2 gave our agent powerful capabilities: it can manipulate files and safely execute code. But try asking it to “refactor the authentication system” in a real project with 500 files, and it hits a wall. The agent doesn’t know:
- What files are relevant to authentication
- How components connect across the codebase
- Which functions call which others
- What context it needs to make safe changes
This is the fundamental challenge of AI coding assistants: context. LLMs have a limited context window, and even if we could fit an entire codebase, indiscriminately dumping hundreds of files would be wasteful and confusing. The agent would spend most of its reasoning power just figuring out what’s relevant.
Now, context engineering is an entire topic on its own, and the way Claude Code does it is different than how Amp Code does it which is different than FactoryAI and so on. This is a large reason why they each behave differently.
For our Baby Code agent, we’re not going to implement anything close to what they’ve done as it’s a large undertaking. However, I do want to show you that even small upgrades to our existing structure can dramatically improve outcomes.
Adding Smart Search
First, instead of having our agent read every file, we allow it to search for specific functions, as determined by the model when it reasons.
def search_files(path: str, pattern: str, file_pattern: str = None) -> str:
    results = []
    for file_path in Path(path).rglob("*"):
        if not file_path.is_file():
            continue

        # Skip noise
        if any(part in ['node_modules', '__pycache__', '.git', 'venv']
               for part in file_path.parts):
            continue

        # Filter by file pattern if specified
        if file_pattern and not fnmatch.fnmatch(file_path.name, file_pattern):
            continue

        try:
            with open(file_path, 'r') as f:
                for i, line in enumerate(f, 1):
                    if pattern.lower() in line.lower():
                        display = line.rstrip()[:200]  # Truncate long lines
                        results.append(f"{file_path}:{i}: {display}")
                        if len(results) >= 50:
                            return '\n'.join(results) + "\n... (limited to 50 results)"
        except (UnicodeDecodeError, PermissionError):
            continue

return '\n'.join(results) if results else f"No matches for '{pattern}'"Now Claude can find that function in one call: `search_files(pattern=”def calculate_tax”)`. The results include file paths and line numbers, so it knows exactly where to look.
Edit, Don’t Rewrite
Our Phase 1 `write_file` tool overwrites the entire file. That works, but it’s:
- Error-prone (easy to accidentally delete something)
- Expensive (sending huge files back and forth burns tokens)
- Slow (more tokens = more latency)
For existing files, surgical edits are better:
def edit_file(path: str, old_string: str, new_string: str) -> str:
    with open(path, 'r') as f:
        content = f.read()

    if old_string not in content:
        return f"Error: Could not find the specified text in {path}"

    if content.count(old_string) > 1:
        return f"Error: Found {content.count(old_string)} occurrences. Be more specific."

    new_content = content.replace(old_string, new_string, 1)

    with open(path, 'w') as f:
        f.write(new_content)

return f"Successfully edited {path}"The constraint that `old_string` must appear exactly once is intentional. It forces Claude to include enough context to uniquely identify the location. Without this, you’d get edits in the wrong place when the same code pattern appears multiple times.
Handle large files gracefully
We always read files before editing them. However, instead of reading the whole file, we want to read chunks of it and focus on the parts that matter.
MAX_LINES = 500

def read_file(path: str, offset: int = None, limit: int = None) -> str:
    with open(path, 'r') as f:
        lines = f.readlines()

    total = len(lines)
    start = (offset - 1) if offset else 0
    end = min(start + (limit or MAX_LINES), total)

    # Add line numbers
    result = '\n'.join(f"{i:4} | {line.rstrip()}"
                       for i, line in enumerate(lines[start:end], start + 1))

    if end < total:
        result += f"\n\n[Showing lines {start+1}-{end} of {total} total]"
        result += f"\nUse read_file with offset={end+1} to see more."

return resultGoing Further: Real Context Management
As I said, we aren’t implementing a production-grade context management system here. But if you want to do that, here are some patterns that Claude Code and others use:
Pattern 1: Memory files
The simplest and most effective technique is persistent memory, a file that gets loaded into every conversation automatically.
Claude Code uses `CLAUDE.md` files for this, other agents use AGENTS.md. You put one in your project root, and it gets injected into the system prompt. Here’s what that looks like:
def build_system_prompt():
    base_prompt = """You are an expert coding assistant..."""

    # Load project memory if it exists
    memory_file = Path("CLAUDE.md")
    if memory_file.exists():
        project_context = memory_file.read_text()
        return base_prompt + f"\n\n## Project Context\n\n{project_context}"

return base_promptWhat goes in this file? Everything Claude needs to know before it starts exploring:
# Project: E-commerce API

## Architecture
- FastAPI backend in `/src/api`
- PostgreSQL database, models in `/src/models`
- React frontend in `/frontend` (separate repo)

## Conventions
- Use Pydantic for all request/response models
- All endpoints require authentication except /health
- Tests go in `/tests`, mirror the src structure

## Current Focus
- Migrating from REST to GraphQL
- Don't modify the legacy /v1 endpointsThis is surprisingly powerful. Instead of Claude spending 5 turns figuring out your project structure, it knows immediately. Instead of guessing at conventions, it follows them from the start.
Pattern 2: Semantic Search with Embeddings
Text search (`search_files`) finds exact matches. But what if you want to find “code that handles user authentication” or “functions similar to this one”?
That’s where embeddings come in. You convert code into vectors that capture semantic meaning, store them in a vector database, and search by similarity rather than keywords.
Here’s the conceptual flow:
# Indexing (done once, updated incrementally)
def index_codebase(directory: str):
    chunks = []
    for file_path in Path(directory).rglob("*.py"):
        content = file_path.read_text()
        # Split into meaningful chunks (functions, classes)
        for chunk in split_into_chunks(content):
            embedding = get_embedding(chunk.text)
            chunks.append({
                "path": file_path,
                "text": chunk.text,
                "embedding": embedding,
                "start_line": chunk.start_line
            })

    # Store in vector database
    vector_db.insert(chunks)

# Retrieval (done per query)
def semantic_search(query: str, top_k: int = 10):
    query_embedding = get_embedding(query)
    results = vector_db.search(query_embedding, limit=top_k)
return resultsThe magic is in how you chunk the code. Naive approaches split by lines or characters, but that breaks semantic units. Better approaches use AST parsing to split by functions, classes, or logical blocks:
def split_into_chunks(code: str) -> List[CodeChunk]:
    tree = ast.parse(code)
    chunks = []

    for node in ast.walk(tree):
        if isinstance(node, (ast.FunctionDef, ast.ClassDef)):
            chunk_text = ast.get_source_segment(code, node)
            chunks.append(CodeChunk(
                text=chunk_text,
                start_line=node.lineno,
                type=type(node).__name__
            ))

return chunksNow instead of `search_files(pattern=”authentication”)`, your agent can do `semantic_search(query=”user login and session handling”)` and find relevant code even if it doesn’t contain the word “authentication”.
Pattern 3: Intelligent Context Selection
The most sophisticated approach is automatic context selection. The agent figures out what’s relevant without being asked.
When you say “fix the bug in the checkout flow”, a smart agent would:
- Search for “checkout” to find entry points
- Trace imports and function calls to find related code
- Look at recent git changes to that area
- Pull in relevant tests
- Check for related documentation
All of this happens before the LLM even starts reasoning about the fix.
Here’s a simplified version:
def gather_context(task: str, codebase_path: str) -> str:
    context_parts = []

    # 1. Find directly relevant files
    search_results = search_files(codebase_path, extract_keywords(task))
    relevant_files = extract_file_paths(search_results)

    # 2. Trace dependencies
    for file_path in relevant_files[:5]:  # Limit to avoid explosion
        imports = extract_imports(file_path)
        for imp in imports:
            if is_local_import(imp, codebase_path):
                relevant_files.append(resolve_import(imp))

    # 3. Find related tests
    for file_path in relevant_files:
        test_file = find_test_file(file_path)
        if test_file:
            relevant_files.append(test_file)

    # 4. Read and concatenate
    for file_path in deduplicate(relevant_files)[:10]:
        content = read_file(file_path)
        context_parts.append(f"### {file_path}\n```\n{content}\n```")

return "\n\n".join(context_parts)Pattern 4: Context Compaction
Long conversations accumulate cruft (old file reads, superseded attempts, irrelevant tangents). At some point, this noise hurts more than it helps.
Context compaction periodically summarizes and compresses the conversation history:
def compact_context(conversation_history: list) -> list:
    if count_tokens(conversation_history) < COMPACTION_THRESHOLD:
        return conversation_history

    # Keep the most recent turns intact
    recent = conversation_history[-6:]
    old = conversation_history[:-6]

    # Summarize older turns
    summary_prompt = """Summarize the following conversation, focusing on:
    - What task was being worked on
    - Key decisions made
    - Current state of any files modified
    - Any errors encountered and how they were resolved
    """

    summary = llm.summarize(old, summary_prompt)

    # Replace old turns with summary
return [{"role": "system", "content": f"Previous context:\n{summary}"}] + recentThis is especially important for long-running sessions. Without compaction, you’ll eventually hit the context limit and lose the ability to continue.
Putting it together
Production coding agents combine multiple strategies for context management:
┌─────────────────────────────────────────────────────────┐
│                    User Request                          │
└─────────────────────────────────────────────────────────┘
                           │
                           ▼
┌─────────────────────────────────────────────────────────┐
│              1. Load Memory (CLAUDE.md)                  │
│    Persistent project knowledge loaded into prompt       │
└─────────────────────────────────────────────────────────┘
                           │
                           ▼
┌─────────────────────────────────────────────────────────┐
│           2. Gather Context (before LLM call)            │
│    Semantic search + dependency tracing + tests          │
└─────────────────────────────────────────────────────────┘
                           │
                           ▼
┌─────────────────────────────────────────────────────────┐
│                   3. ReAct Loop                          │
│    LLM reasons and acts with curated context             │
└─────────────────────────────────────────────────────────┘
                           │
                           ▼
┌─────────────────────────────────────────────────────────┐
│            4. Compact (if needed)                        │
│    Summarize old context to make room for new            │
└─────────────────────────────────────────────────────────┘Our Phase 3 agent only does step 3. That’s enough to be useful, but it’s why Claude Code and others feel so much more capable on large projects. They’re doing all four steps.
What We’ve Built
If you’ve made it this far and implemented everything, congratulations! You now have a real working agent. Across three phases, we’ve built:
| Phase | What We Added | Lines of Code |
|-------|---------------|---------------|
| 1 | ReAct loop, file tools, streaming | ~200 |
| 2 | Python sandbox, bash execution | ~350 |
| 3 | Search, edit_file, pagination | ~400 |That’s a functional coding agent in about 400 lines of Python. It can:
- Navigate and understand codebases
- Read and edit files surgically
- Run code and shell commands
- Iterate on errors autonomously
- Stream responses in real-time
I tested out our Phase 3 agent by asking it to generate a personal finance tracking app. It built a fully functioning product in one shot with multiple files.
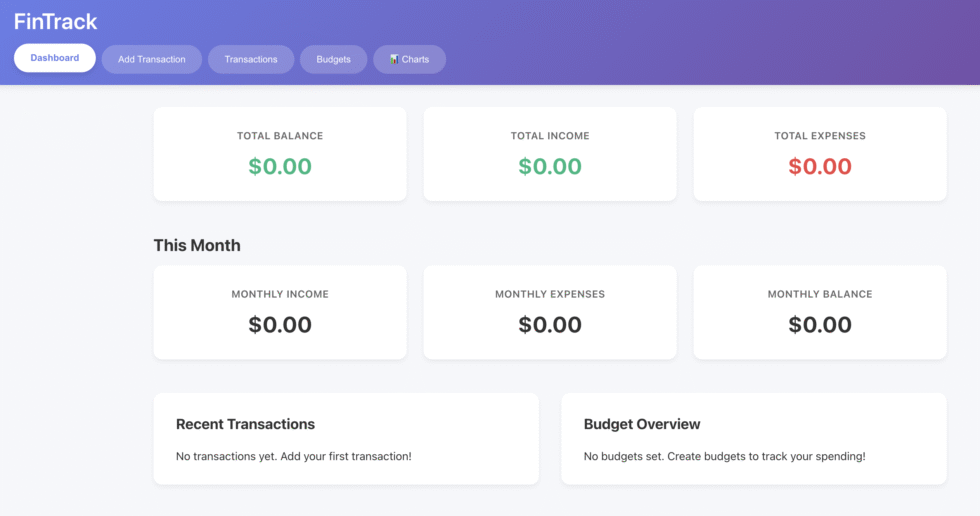
Initially, it didn’t have the Charts section. After it was done I asked it to add it in and it didn’t need to read every single file. Instead, it was able to pinpoint where exactly it needed to insert the chart component and added it the app flawlessly.
The full code is on my GitHub (enter your email in the form below to get the link) and organized into three phases, each self-contained and runnable:
baby-code/
├── phase1-minimum-viable/
│   └── agent.py           # ReAct loop + file tools
│
├── phase2-code-execution/
│   ├── agent.py           # Main agent
│   ├── tools.py           # Tool definitions
│   ├── validator.py       # AST safety checker
│   └── executor.py        # Python sandbox
│
├── phase3-context-management/
│   ├── agent.py           # Main agent
│   ├── tools.py           # Extended tools
│   ├── validator.py       # Same as Phase 2
│ └── executor.py # Same as Phase 2Each phase builds on the previous one. The structure stays consistent but `tools.py` just gets more functions, and `agent.py` gets an updated system prompt.
Clone it, run it, break it, improve it. That’s the best way to learn.
And if you build something cool with it, let me know. I’d love to see what you create.